Kubernetes Distributed Performance Testing using Locust

In this step by a step tutorial that illustrates how to integrate and use Locus to test microservices running in a Kubernetes cluster, we will cover the following topics:
Introduction
In this step by a step tutorial that illustrates how to integrate and use Locus to test microservices running in a Kubernetes cluster, we will cover the following topics:
- How to deploy the Guestbook application.
- Some Locust test cases (We will be using the Guestbook application).
- Build Docker images for Locust master and worker.
- Deploy Locust in distributed mode and perform load tests.
Requirements
Before proceeding, ensure that your environment satisfies the requirements; start by installing and deploying Docker, Kubernetes, and Git.
Preparing the Kubernetes Cluster
Before jumping to explain how Locust can be used to test microservices running on Kubernetes clusters, we need to prepare and deploy the services we will test on a cluster. These services are shown in the diagram below. The setup includes the following components:
- Redis master instance (write requests).
- Redis slave worker (read requests).
- Frontend application. This application is configured to use both the Redis master and slave to write and read requests

To deploy the above setup locally, please follow the below steps:
$> git clone git@github.com:eon01/kubernetes-locust-example.git

$> cd locust/guestbook

$> kubectl apply -f .
These are the services and deployments included in the YAML files:
- Redis deployment and services
- Frontend deployment and services.
The GuestBook will be available on the following URL: http://127.0.0.1:30625, and you can verify this using the below command:
$> kubectl get allLocust: Introduction
Performance and load testing are among the hottest topics that should be handled during the software life cycle. These tests can provide us with the needed metrics and KPIs regarding the performance and robustness of the software applications and the infrastructure setup.
Locust is one of the tools that can be used for performing user behavior load tests. It relies on the popular python programming language to define the load test scenarios. This means that it is possible to perform some conditional behavior or do some calculations.
Locust also supports running distributed load tests over multiple workers/machines. The tool comes with a web interface to configure and run the predefined tests with multiple configurations.
In this blog post, we will present the needed steps to use Locust to test the Guestbook application in a distributed model. To be able to achieve this goal we need to implement the following items.
- Define the test cases (locust files)
- Docker images for Locust
- Deploy master and slave Locust workers.
- Allow the communications between Locust worker and master.
Locust: Test Cases
We need to write some test cases in Python to test the GuestBook application. The application interface is straightforward and consists of only one textbox and one button, as shown in the below picture.

For the sake of simplicity, we are going to implement two use cases.
- Open the Guestbook on the frontend page
- Add a static guest name to the GuestBook.
The locust file below can be used to test these use cases.
from locust import HttpUser, task, between

class MyUser(HttpUser):
   wait_time = between(5, 15)

    @task
   def index(self):
       self.client.get("/")
    @task
   def update(self):
       self.client.get("/guestbook.php?cmd=set&key=messages&value=,JohnDietish,")
Locust: Docker Images
The next step is building Docker images for Locust master and slave workers with the defined use cases. These Docker images will be used later to deploy Locust components on the cluster.
This is how the Locust Docker image file structure looks like.
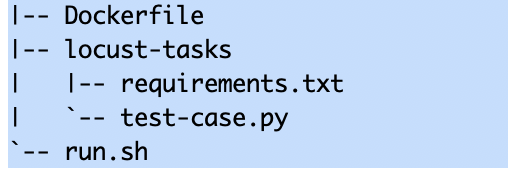
Our Docker image must include at least the following files:
- Dockerfile: This file will contain the needed instructions to build our Docker image.
- requirements.txt: This file includes a list of Python libraries needed to run Locust.
- test-case.py: This is the test case file written in Python.
- run.sh: A shell script that works as an entrypoint for Docker to support master and slave workers. Below is how this file looks like:
LOCUST="locust"
LOCUS_OPTS="-f /locust-tasks/test-case.py --host=$TARGET_HOST"
LOCUST_MODE=${LOCUST_MODE:-standalone}

if [[ "$LOCUST_MODE" = "master" ]]; then
   LOCUS_OPTS="$LOCUS_OPTS --master --master-port=5557"

elif [[ "$LOCUST_MODE" = "worker" ]]; then
   LOCUS_OPTS="$LOCUS_OPTS --worker --master-port=5557 --master-host=$LOCUST_MASTER_URL"
fi

echo "$LOCUST $LOCUS_OPTS"

$LOCUST $LOCUS_OPTS
To build the docker image locally, please follow the below steps
$> git clone git@github.com:eon01/kubernetes-locust-example
$> cd locust/docker
$> docker build -t locust:guestbook .
Locust: Deploying in Distributed Mode
Now that we created the Docker image for our test cases, it is time to start deploying a distributed Locust cluster, and we are going to use Kubernetes for that. Note that you can deploy Locust on a single VM without Kubernetes, but in case you need a distributed testing, a Kubernetes cluster is the ideal choice to use.
To achieve this task we need to create the following Kubernetes resources.
- Locust master deployment
- Locust master service.
- Locust worker deployment.
All the above resources are standard Kubernetes objects. The most critical factors in defining these objects are providing each of the objects with the correct values for the needed environment variables and exposing the correct ports.
Below is the definition file for the master deployment.
As shown in the definition file, it is very important to pass the environment variables LOCUST_MODE and TARGET_HOST to the container; otherwise, the containers will not be configured to run as a master Locust instance.
apiVersion: apps/v1
kind: Deployment
metadata:
 name: locust-master
 labels:
   name: locust-master
spec:
 replicas: 1
 selector:
   matchLabels:
     app: locust-master
 template:
   metadata:
     labels:
       app: locust-master
   spec:
     containers:
       - name: locust-master
         image: locust:guestbook
         env:
           - name: LOCUST_MODE
             value: master
           - name: TARGET_HOST
             value: http://frontend-internal
         ports:
           - name: loc-master-web
             containerPort: 8089
             protocol: TCP
           - name: loc-master-p1
             containerPort: 5557
             protocol: TCP
           - name: loc-master-p2
             containerPort: 5558
             protocol: TCP
On the other hand, the worker definition file needs to pass different values for LOCUST_MODE and it must pass another variable called LOCUST_MASTER to establish the communications between the worker(s) and the master. Below is the definition file for deploying the Locust worker pool:
apiVersion: apps/v1
kind: Deployment
metadata:
 name: locust-worker
 labels:
   name: locust-worker
spec:
 replicas: 4
 selector:
   matchLabels:
     app: locust-worker
 template:
   metadata:
     labels:
       app: locust-worker
   spec:
     containers:
       - name: locust-worker
         image: locust:guestbook
         env:
           - name: LOCUST_MODE
             value: worker
           - name: LOCUST_MASTER_URL
             value: locust-master
           - name: TARGET_HOST
             value: http://frontend-internal
Finally, the service object is needed to expose the master component to be accessed via the web interface and also from the worker containers. Below is the definition file for the Locust service.
kind: Service
apiVersion: v1
metadata:
 name: locust-master
 labels:
   app: locust-master
spec:
 ports:
   - port: 5557
     targetPort: loc-master-p1
     protocol: TCP
     name: loc-master-p1
   - port: 5558
     targetPort: loc-master-p2
     protocol: TCP
     name: loc-master-p2
 selector:
   app: locust-master

---
kind: Service
apiVersion: v1
metadata:
 name: locust-master-ui
 labels:
   app: locust-master
spec:
 ports:
   - port: 8089
     targetPort: loc-master-web
     protocol: TCP
     name: loc-master-web
     nodePort: 30627
 selector:
   app: locust-master
 type: NodePort
To deploy Locust pods locally, follow these steps:
$> git clone git@github.com:eon01/kubernetes-locust-example
$> cd locust/k8s
$> kubectl apply -f .
Once the above commands are executed, 4 Locust workers, one master (and a service for the master Pod), will be created.
The Locust interface will be accessible on the following URL: http://localhost:30627
You can verify the creation of the resources using the below command
$> kubectl get allLocust: Running Tests
To Start running test use cases and test the Guestbook application running in Kubernetes we need to navigate to the Locust interface running at http://localhost:30627. The below image shows the Locust interface.
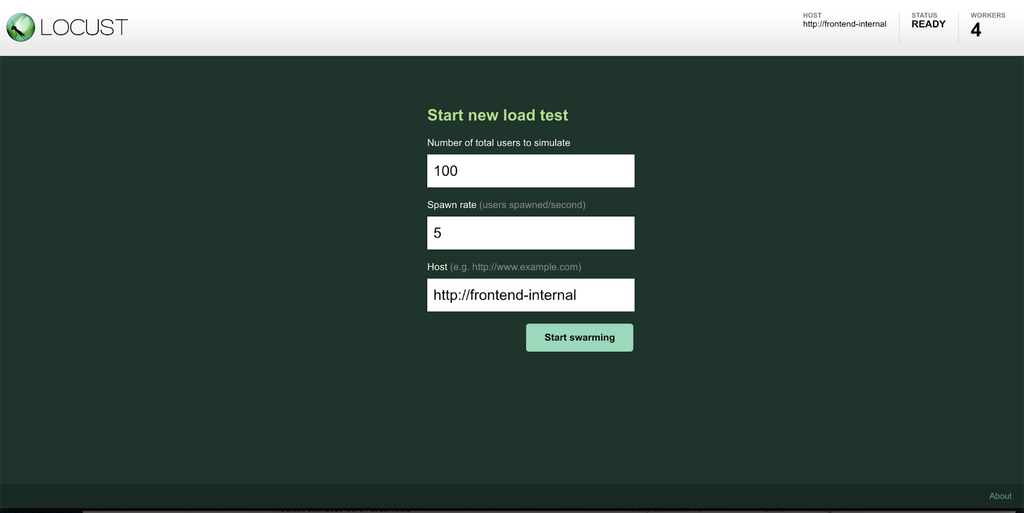
The frontend page asks for the number of the users that will be used to perform the load test and the users’ spawn rate. The interface also shows the number of workers attached to the Locust installation.
Once You fill the form and hit the submit button, you will be redirected to the statistics page and Locust will start performing the defined tests from the Docker image.
The image below shows the statistics page from Locust where we can see the statistics for each of the defined use cases.

In case there is a need to adjust the load test configurations, such as increasing the user’s number, you can click on the edit link on the top of the page and the below form will appear on the screen to enter the new values.

Failures and errors are also reflected in the statistics page; as the below image shows, the statistics page displays the failed requests count and rate for each of the test cases.

Locust also provides us with another view to display the exact failures errors while it is possible to verify the root cause of the failure or error, as shown in the below image.

Finally, Locust also provides other views and pages such as the chats page where the progress of the load tests are illustrated via charts and diagrams, The worker page to display info regarding the Locust workers, and the download data page where we can download the load tests data. The below images show an example of these pages.
Get similar stories in your inbox weekly, for free
Share this story:

Cloudplex
Founder and CEO of Cloudplex - We make Kubernetes easy for developers.

Latest stories

Best Cloud Hosting in the USA
This article explores five notable cloud hosting offers in the USA in a detailed way.

Best Dedicated Hosting in the USA
In this article, we explore 5 of the best dedicated hosting providers in the USA: …


The best tools for bare metal automation that people actually use
Bare metal automation turns slow, error-prone server installs into repeatable, API-driven workflows by combining provisioning, …

HIPAA and PCI DSS Hosting for SMBs: How to Choose the Right Provider
HIPAA protects patient data; PCI DSS protects payment data. Many small and mid-sized businesses now …

The Rise of GPUOps: Where Infrastructure Meets Thermodynamics
GPUs used to be a line item. Now they're the heartbeat of modern infrastructure.

Top Bare-Metal Hosting Providers in the USA
In a cloud-first world, certain workloads still require full control over hardware. High-performance computing, latency-sensitive …

Top 8 Cloud GPU Providers for AI and Machine Learning
As AI and machine learning workloads grow in complexity and scale, the need for powerful, …

How ManageEngine Applications Manager Can Help Overcome Challenges In Kubernetes Monitoring
We tested ManageEngine Applications Manager to monitor different Kubernetes clusters. This post shares our review …

AIOps with Site24x7: Maximizing Efficiency at an Affordable Cost
In this post we'll dive deep into integrating AIOps in your business suing Site24x7 to …

A Review of Zoho ManageEngine
Zoho Corp., formerly known as AdventNet Inc., has established itself as a major player in …
