Develop AWS Lambda functions locally and use AWS SAM to deploy them to your account
in DevOps , Serverless , Cloud Computing , APIs

Step by step explanation on how to develop your serverless AWS Lambda functions locally in an IDE of your choice. In this article we are using AWS SAM (Serverless Application Model) to build and deploy our serverless apps.
I think we can all agree on the fact that the current cloud buzzword is “serverless”.
This is also driven by the cloud vendors. That certainly stands out when you complete one of the AWS certification exams (small hint: when you need to choose between a server managed or serverless solution, you know what to pick :-)).
“AWS Lambda is a serverless compute service that lets you run code without provisioning or managing servers”. I’ve copied that definition from the AWS website but it perfectly describes what the service itself actually does. It lets you run code without worrying about the underlying architecture and resources. It supports Java, Go, PowerShell, Node.js, C#, Python, and Ruby.
All good, but let’s be honest, nobody likes to develop his code within the AWS web interface like below:
So I’m basically explaining in this article how you can develop your Lambda functions locally in an IDE of your choice and deploy your function to AWS.
SAM (Serverless Application Model)
SAM is a framework that is offered by AWS to make your life easier when developing serverless applications. A serverless application is not only your Lambda function but can also contain other services like API Gateway etc.
SAM consists of two components which are the “template specification” and a “command line interface”. With templates you can describe which functions, API’s, permissions etc. are linked to your serverless application in a standardized and clean way. SAM is using this template to know which AWS resources need to be setup in AWS itself (using CloudFormation). With the command line interface you can give commands (ex. sam build, sam deploy etc.) for building and deploying your application (and many more).
If we want to develop our serverless applications locally we also need an interpreter who behaves in the same way as AWS would do when executing your serverless function. So therefore SAM is able to use a Docker container which you can use out-of-the-box and is used to run your serverless functions while developing locally.
How to install AWS SAM on your OS?
You need the following components installed to make use of AWS SAM:
- You need an AWS account (obviously).
- AWS CLI needs to be installed. Note that this is not the AWS SAM CLI. Both are different things. To install the AWS CLI, use the following link: https://docs.aws.amazon.com/cli/latest/userguide/install-cliv2.html
- You need Docker.
- Last but not least, you need the AWS SAM CLI :).
You access the installation instructions for steps 3 & 4 through the following link depending on your OS:
You can check whether you have installed everything by typing the following commands:
aws --version
sam --version
docker --version
Let’s get started with AWS SAM
I assume that you have all the pre-requisites installed. In this article I’m always choosing Python (3.8) as programming language, but you can choose any of the programming languages mentioned in the instructions.
- Navigate to the directory in which you want to create your serverless application. Note that while using SAM to initiate the application it will create a folder automatically, so you don’t need to create one by yourself.
- We will use the “sam init” command which will automatically setup the structure of your application. This commands need two arguments, the runtime (programming language of your choice) and a name (this will be the name of the folder that is automatically created when executing the command. Btw. if you want to know which runtimes are available, just run the “sam init — help” command.
sam init --runtime python3.8 --name demo-serverless-appWhen running the command above you’ll also get asked which template source you want to use:
During the init, SAM will automatically generate a “template.yaml” file. This file is one of the two components of SAM and will contain crucial info about your application, like the folder structure, connection to event sources (API Gateway etc.), permissions and many more.
AWS Quick Start Templates are basically example apps provided by AWS to already give you an example on how a serverless application structure may look like. In this article I’m using the “hello_world” example because it’s already using an API Gateway as event source (so it’s a good starting point).
With Custom Template Location you can point to your own template (example application) and use that as a starting point.
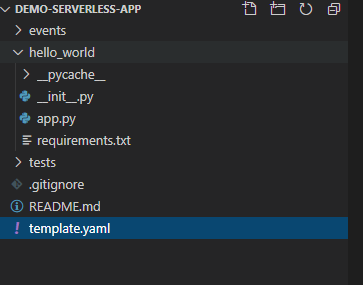
3. After you’ve done with the init, SAM made a specific folder based on the name you’ve passed to the init command. You can open this folder with an IDE of your choice and you’ll see the following folder structure:
This article is focused on the local development and deployment of your application. I’m not going into detail on how to use Lambda in general. You’ll see the “app.py” file in the hello_world folder. This file contains your lambda handler of your sample application.
If we take a look at the template file you’ll see that SAM already prepared a template which is using the “lambda_handler” function in the app.py file as function handler. The template also contains an API Gateway endpoint with the ‘/hello’ path as event source. You can find detailed instructions about each of the components within the template here: https://docs.aws.amazon.com/serverless-application-model/latest/developerguide/sam-specification-template-anatomy.html
Remember that this template is used during the deployment of your application and that SAM will create a CloudFormation stack which will contain all of the AWS resources you described in it.
IMPORTANT: before you deploy you need to create an AMI role which has the necessary permissions and add the role to your template:
Check out the following article if you’re not sure how to setup this Lambda execution role: https://docs.aws.amazon.com/lambda/latest/dg/lambda-intro-execution-role.html
Build your application
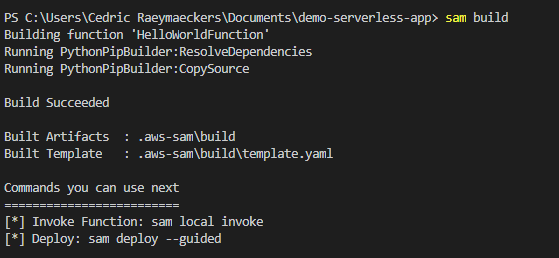
The next thing you need to do before you can test your application is building it. By building the application, SAM creates a new folder. This folder will contain your application but also all of the modules which SAM found in your requirements.txt file. These modules are automatically downloaded by SAM when building. (small tip: if you want to connect to Postgres using psycopg2, use ‘aws-psycopg2‘ in your requirements.txt file).
You can easily build the app by using the following commands:
# when u want to build the application using the interpreter which
# is installed on your local machine
sam build
# when u want to build the application using a docker container which sam is automatically retrieving
sam build --use-container
Test your application locally
When testing our application locally SAM is using a Docker image which is simulating the AWS runtime. The “sam local” command was created for all local testing functionalities and has a broad range of functions like invoke, start-api, start-lambda etc. I’m describing two of the main used functions in this article which are the following (you pick one based on your event source):
- start-api
If you execute the following command:
sam local start-apiSAM is spinning up a Docker image which contains an HTTP server that hosts all of your functions. SAM is using your ‘CodeUri’ property within your template to find the path in your file system that contains the Lambda function code. Use this functionality when you are developing a Lambda application that uses API Gateway as its event source.
If we execute the command above for the ‘hello_world’ application we get the following output:
So basically we have a local endpoint up and running which can be accessed on 127.0.0.1:3000 and is ready to receive sample events using Postman or whatever tool you prefer.
2. local invoke
With local invoke you are running your application once and it automatically quits executing as soon as the interpreter is finished. It’s also using a Docker image to perform the execution itself. You often use a sample event.json file that is being passed manually to your function (for development purposes).
This command will not work out of the box for our “hello_world” application because this app is using API Gateway as event source and can only be locally tested using the “sam local start-api” command as described above.
Command including a sample event.json file:
sam local invoke --event events/event.jsonDeploy your application to AWS
The deployment process consists of two steps. First you need to package your application and upload it to a bucket of your choice on S3 by using the “sam package” command. After you’ve packaged your application, you’re ready to deploy it.
- Package your application
SAM will automatically zip your application and upload it to a bucket of your choice on S3. This zip file will be used during the deployment to AWS. You can use the following command to package your application:
sam package --template-file template.yaml --output-template-file deploy.yaml --s3-bucket demo-bucketChange the output template filename to whatever you like. I’ve used “deploy.yaml” in this example. The “template-file” parameter is pointing to your actual template file which is part of your application, so it needs to be identical to the one you are using in the app.
After you’ve executed the command you’ll see something like this:
2. Deploy your application
You are now completely ready for deployment. In this article I’m using a guided deploy because it’s pretty handy to fill in all the necessary parameters, but you can use additional parameters when you are familiar with the command.
Execute the following command to start the deployment process:
sam deploy --guidedAfter executing your sam deploy command you need to answer a bunch of questions, so let’s dig into these:
After you’ve passed all the deployment steps SAM will create a CloudFormation stack changeset. A changeset is, as the name already describes, a set of changes. In this case it will be a new stack but when I deploy for a second time it will contain the changes itself. SAM will now ask to deploy this changeset:
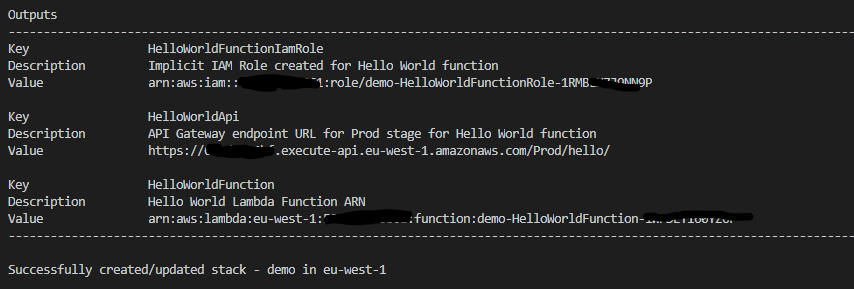
Just confirm the deployment and you’ll see that SAM is creating all of the necessary AWS resources which are part of your CloudFormation stack (this stack is made based on the template.yaml file).
Checking everything out in AWS :)
Congrats! You’ve successfully deployed your AWS Lambda application. Let’s take a look at our new AWS Lambda function:
You’ll see that you’ll have a new Lambda function that is automatically linked to an API Gateway etc.
You can also check which resources were setup by looking into the CloudFormation stack itself:
Get similar stories in your inbox weekly, for free
Share this story:

Cedric Raeymaeckers, Senior Data Engineer @ Datashift
I'm a Senior Data Engineer working for Datashift (consultancy firm based Belgium, Mechelen) who gets triggered by impact and technology.
Latest stories
How ManageEngine Applications Manager Can Help Overcome Challenges In Kubernetes Monitoring
We tested ManageEngine Applications Manager to monitor different Kubernetes clusters. This post shares our review …
AIOps with Site24x7: Maximizing Efficiency at an Affordable Cost
In this post we'll dive deep into integrating AIOps in your business suing Site24x7 to …
A Review of Zoho ManageEngine
Zoho Corp., formerly known as AdventNet Inc., has established itself as a major player in …
Should I learn Java in 2023? A Practical Guide
Java is one of the most widely used programming languages in the world. It has …
The fastest way to ramp up on DevOps
You probably have been thinking of moving to DevOps or learning DevOps as a beginner. …
Why You Need a Blockchain Node Provider
In this article, we briefly cover the concept of blockchain nodes provider and explain why …
Top 5 Virtual desktop Provides in 2022
Here are the top 5 virtual desktop providers who offer a range of benefits such …
Why Your Business Should Connect Directly To Your Cloud
Today, companies make the most use of cloud technology regardless of their size and sector. …
7 Must-Watch DevSecOps Videos
Security is a crucial part of application development and DevSecOps makes it easy and continuous.The …


