Building my first homebrewed datacentre
How I offloaded all my computation needs to a homebrewed datacentre using off the shelf commodity hardware and virtualisation

As the first wave of pandemic and subsequent lockdown started earlier this year, I knew that it will be some time before things got back to normal again and knowing myself this was the perfect opportunity to work on all the things that I wanted to for a while, technical and non-technical alike. Coincidently, I had recently been working on few things on the side that required me to brush up on some of my design skills, additionally, I was keen to revisit my nostalgic days of PC gaming. Little did I know this will also rekindle my love for data networking and the technologies in that space. Up until now I had been using a laptop for quite a few years to do all my work, mobile and console for gaming and knew that I would need something more robust for my needs. So I started to look around for a new workstation. However, I didn’t know this will turn into a project that eventually ended up taking quite a big part of my free time and afforded to me an opportunity to take a sneak peak in the world of datacentre technologies, albeit on a much smaller and simplified scale.
How it all started
I had always been a big fan of AMD and their product line until the Intel craze took over in the previous years. However I still remembered using decent AMD builds during my graphic design days and those AMD builds never betrayed me and were always performant (partly because of the best core value for your money). So I bought a highly spec’ed and much needed workstation. A 24 Core AMD 2970WX Threadripper, 32 GB memory, 2 x 1TB SSD NVMe and 1TB HDD based workstation in a mini ATX form. I also bought An NVIDIA GTX Geforce 1050 Ti and an AMD Radeon Sapphire Pulse RX 570 4gb to help with my GPU based workloads. The entire build itself wasn’t aesthetically exceptional but my aim was to focus on function while getting as much performance as possible. Additionally I had recently acquired an AMD based mini-pc (similar to an Intel NUC) with 8 AMD cores and integrated Radeon Vega Mobile Graphics chip which I decided to use as part of the experiment.
For my day to day tasks, my macbook pro was sufficient but moving from a MacOS to a Windows / Linux OS was going to be disruptive on how I work and manage personal / work related tasks. On top of that, I wanted to keep my personal and work environments separate as well as my data backup strategies. I also wanted to experiment with streaming Media / Games I owned to the different rooms of the house using something like Plex, Parsec and XBox console streaming. This seemed like a perfect scenario to use some of the virtualisation technologies available out there built atop a solid network. To date, I had mostly worked with type-2 hypervisors like virtualbox, parallels, vagrant etc. and some experience in type-1 hypervisors like Xen and Citrix (mostly in on-prem environments), however after some contemplation and research I realised that this is essentially a job for a type-1 hypervisor and thus my journey to build a small scale private datacentre / homelab started. In the next few sections I go through a summarised process of building the said datacentre.

Preparation and considerations
Happy with my recent acquisition of powerful computation units, the leading question now was how and where do I start? So I started to review all my computation needs and pain points around:
- Computing resources for myself and family members (with / without GPU)
- Resources for personal experiments
- Generic computing resources / long running processes
- Distributed workloads using container orchestration tools
- Serverless / headless for one off / scheduled tasks
- Streaming of personal Media / Games over LAN
- Integration with Cloud providers (GCP, AWS, Auzre) if needed
- Decoupled data storage and resilient backup strategy
So it seemed my workloads will be a combination of a VDI (Virtual Desktop Infrastructure) solution combined with varying workloads related to physical and virtual networks and SDN configurations, cron jobs, batch processing, container orchestration and distributed computing resources. What about data storage? If I am to virtualise my workloads, I will have to implement a data storage solution in a way so that all my resources can access over the Network. What about network bandwidth? 1Gbps, 10Gbps or more? This will also help me build more robust backup strategies around my data. I researched different solutions around this and NAS seemed to be the easiest solution, so I purchased a Terramaster NAS enclosure with 10Gbps data transfer capability, however I also found 2 x NetApp DS2246, 23 drive SAN array(s) (upto 80Gbps transfer rates) off ebay for cheap. This together was going to give me a robust enough solution for all my data needs.
After doing some architectural sketches and due research I decided to deploy a KVM (Kernel based Virtual Machine) based solution. There were alternatives such as VMware ESXi and Xen and I had worked with them briefly in the past as I mentioned but I chose KVM because of the following reasons:
- KVM, comparatively, seemed challenging to deploy so I knew this would keep me engaged in coming months.
- KVM uses something called VFIO to assign PCI devices (think of GPUs, Network cards etc) to guest vms without impacting the underlying OS and the performance can be near baremetal (if optimised)
- All major public cloud vendors either use KVM or have moved away from other platforms to start using KVM.
Now that I had decided what I will be using to virtualise my newly acquired hardware, it was time to roll up my sleeves and get down to work.

Network layer
I knew for me to have a really robust solution for all my needs, I would need a performant network with excellent bandwidth. For any sized infrastructure with distributed components, networking layer (You can read more about Network engineering in my other post) makes up the backbone of the architecture. The situation here was no different. If I wanted my infrastructure to work reliably and to have it highly available, I knew I needed to invest in some networking equipment which can be costly and optimising bottlenecks time consuming. However, this would become the one of the most important component within the entire Architecture to achieve my goal of a resilient and highly performant VDI solution.
1Gbps LAN + 10Gbps LAN
I didn’t want to take any chances so I invested in prosumer grade networking equipment i.e. Ubiquiti’s Dream Machine Pro and USW PoE 24-port switch to manage my multiple service providers and handle my 1Gbps LAN workloads respectively and MikroTik’s CRS309 SPF+ 8-port Aggregation switch (Upto 81 Gbps of non-blocking throughput) for my Fiber based LAN streaming workloads. Since majority of my traffic would be east-to-west, this is what I felt would be the best way to design a network. This also would be closest to a two-tier network design (also known as spine-leaf design).
I also opted to choose two different service providers in case one of my ISP suffered a performance downgrades / outages due to additional load during lockdowns and the fact that multitudes of people would be working from home. In hindsight this was a good decision as I found out later in the process, one of my ISP’s did suffer from terrible service and if it wasn’t for a redundant connection, I would have been terribly affected. Additionally I was able to test out load-balancing and link aggregation between two service providers.
I also made sure I setup additional backup by using a 4G router in case both of my ISP’s are down so that I can maintain connectivity to the public internet.

Core services layer
Although this part wasn’t mandatory to a working solution, I wanted to make sure that the entire homelab is setup in a way where nodes, devices, hosts, guests, services and applications were able to discover and resolve each other. As I was already using a poor man’s discovery service i.e. DNS using a Raspberry Pi to resolve names and service endpoints, I decided to extend and add more services to this layer. I added a Hashicorp’s Vault service to run my CA authority and manage secrets, OpenLDAP for user management and a lightweight build agent using gitlab-runner.
These services would allow me to manage my virtualisation layer, device discovery and name resolution, user and Identity management either manually or using automation via terraform and / or ansible.

Virtualisation Layer
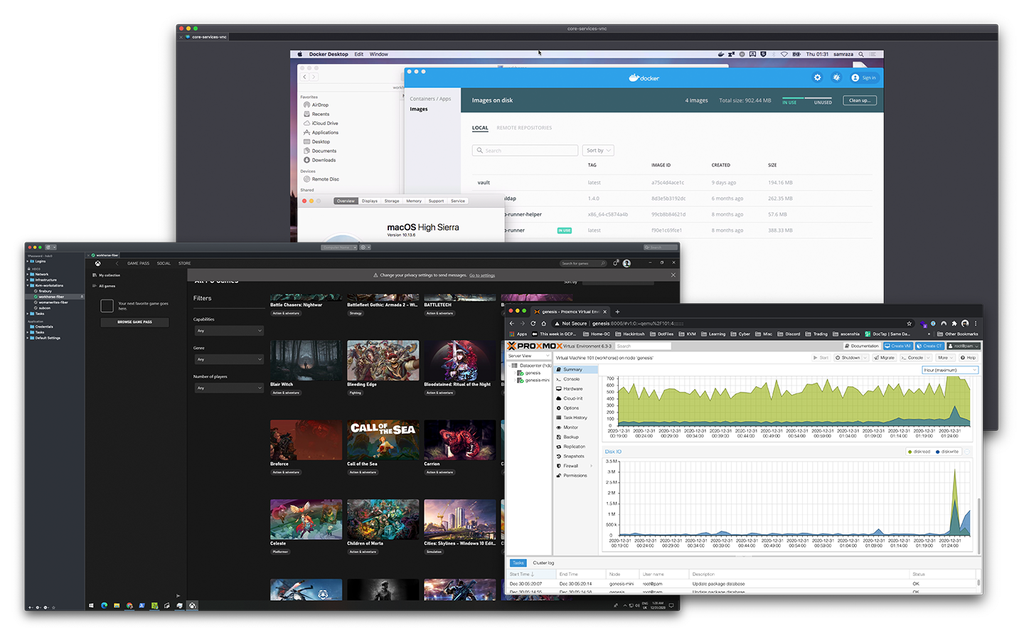
Now that I had chosen KVM as my virtualisation platform, I needed to make a decision if I would be running KVM natively on a linux build. I played around and compared multiple KVM based platforms such as Ovirt, Unraid, Proxmox along with my own Debian based VM with libvirt extension enabled and Qemu for hardware virtualisation. I found working with KVM directly was a lot more hassle and my intention was. to use the Host OS only for KVM instead of a fully functional OS (which is completely possible). I wanted to run all my VMs as Guests so that I can make use of the fancy features like clustering, backups, snapshots and live migrations with a console or simplified cli. I was also able to test live migrations of VMs between nodes without any downtime and was surprised by the stability of underlying baremetal performance while doing so. I wouldn’t go in detail but I feel I will have to do a separate post on this.

Guest VMs, VDI Solution & Container workloads
One challenge I had was with Guest VMs compatibility with BIOS vs UEFI and GPU passthroughs. Let me explain. When I want to create a Windows / MacOS (Hackintosh) based VM for gaming, 3D graphics work or latency-sensitive workloads, I want to use one of my GPUs. The Proxmox Host when booting initialises the GPUs so they cannot be utilised if they are being used by the host. However, as I mentioned earlier, I never intended to use my GPUs with the Host itself, it was only for Guest VMs. For that I had to isolate it from my Proxmox Host and make sure that it doesn’t have access to it nor it is initialised and do a passthrough using VFIO. This meant that I had to make sure that my IOMMUs (Input-Output Memory Units) are enabled and I can identify my devices by Id and use those Ids to tell my KVM Host (Proxmox) to not initialise it. Then I needed to create or start a VM and, during creation, I had to make sure I could add those isolated devices as my passthrough devices. Easier said than done. I spent a long time trying to boot using BIOS instead of UEFI, eventually realising the only way my hardware / setup would work would be if I used (OVMF based) UEFI so that I can passthrough my GPUs to my Guest VMs (I will do a separate post for GPU Passthrough using Proxmox). Finally I was able to successfully create and use VMs with GPUs for my graphics heavy workloads and games / streaming.
For most of my Guest VMs, OS / Container Images are regularly fetched from popular mirrors and others are customised for personal use and stored on shared NFS storage. VMs and disks are backed up nightly or weekly depending on the usecase through AutomatedOps (GitOps).
Laptop as a Thin Client
At this stage, since most of my workloads were handled by my localised virtual desktop infrastructure, I was able to use my existing laptop as a thin client device. Now, whenever I need to start / stop / create a virtual machine, I can either do it through Proxmox web UI console or via CLI provided by proxmox and have a VM ready to use in no time. As I was also using a dual monitor setup, I can access my VMs through a remote desktop manager like nomachine or RDP or simply switching my source on my monitor to HDMI source where my Virtualised Desktop is connected and take advantage of a direct video output connection.
Conclusion
In the end, I have a fully working VDI solution with additional capacity to have varied computation workloads. I’ve been running my VM guests for a while and don’t have any issue so far. The next steps would be performance analysis and individual posts on some of the omponents and how I’ve deployed / configured them using AutomatedOps / GitOps and some of my other challenges during this journey in detail.
Get similar stories in your inbox weekly, for free
Share this story:

Sam Raza, Reliability Engineer / Consulting Engineer @ Rackspace Ltd
Full-stack developer focusing on delivering value within Infrastructure, DevOps and Reliability engineering space and history of working within #bigdata, #advertising, #insurance and #finance industries. I tend to have a consultative approach with hands-on technical skills and capabilities to see projects through to completion. I am a huge automation evangelist and believe in empowering the development teams to focus on workflows and processes instead of technologies.
Published by
Full-stack developer focusing on delivering value within Infrastructure, DevOps and Reliability engineering space and history of working within #bigdata, #advertising, #insurance and #finance industries. I tend to have a consultative approach with hands-on technical skills and capabilities to see projects through to completion. I am a huge automation evangelist and believe in empowering the development teams to focus on workflows and processes instead of technologies.

Latest stories

Best Cloud Hosting in the USA
This article explores five notable cloud hosting offers in the USA in a detailed way.
Best Dedicated Hosting in the USA
In this article, we explore 5 of the best dedicated hosting providers in the USA: …


The best tools for bare metal automation that people actually use
Bare metal automation turns slow, error-prone server installs into repeatable, API-driven workflows by combining provisioning, …
HIPAA and PCI DSS Hosting for SMBs: How to Choose the Right Provider
HIPAA protects patient data; PCI DSS protects payment data. Many small and mid-sized businesses now …

The Rise of GPUOps: Where Infrastructure Meets Thermodynamics
GPUs used to be a line item. Now they're the heartbeat of modern infrastructure.

Top Bare-Metal Hosting Providers in the USA
In a cloud-first world, certain workloads still require full control over hardware. High-performance computing, latency-sensitive …

Top 8 Cloud GPU Providers for AI and Machine Learning
As AI and machine learning workloads grow in complexity and scale, the need for powerful, …

How ManageEngine Applications Manager Can Help Overcome Challenges In Kubernetes Monitoring
We tested ManageEngine Applications Manager to monitor different Kubernetes clusters. This post shares our review …

AIOps with Site24x7: Maximizing Efficiency at an Affordable Cost
In this post we'll dive deep into integrating AIOps in your business suing Site24x7 to …

A Review of Zoho ManageEngine
Zoho Corp., formerly known as AdventNet Inc., has established itself as a major player in …
