Understanding Kubernetes Autoscaling
in DevOps , Kubernetes , Orchestration , Cloud Computing

Kubernetes provides a series of features to ensure your clusters have the right size to handle any type of load. In this blog post, we will look into the different auto-scaling tools provided by Kubernetes and learn the difference between the horizontal pod autoscaler, the vertical pod autoscaler and Kubernetes Nodes autoscaler.
Developers use Kubernetes to ship faster to their users and respond to their requests as quickly as possible. You design the capacity of your cluster on the estimated load your users will generate on it. But imagine your service went viral, and the number of requests grows faster than you ever imagined. You risk running out of compute resources, your service might slow down, and users may get frustrated.
When you allocate resources manually, your responses may not be as quick as required by your application's changing needs. This is were Kubernetes Autoscaling comes in: Kubernetes provides multiple layers of autoscaling functionality: Pod-based scaling with the Horizontal Pod Autoscaler and the Vertical Pod Autoscaler, as well as node-based with the Cluster Autoscaler. It automatically scales up your cluster as soon as you need it and scales it back down to its regular size when the load is lower. These layers ensure that each pod and cluster has the right performance to serve your current needs.
Create Kubernetes clusters in seconds:
Kubernetes Architecture
In Kubernetes, a set of machines for running containerized applications is called Cluster. A cluster contains, at minimum, a Control Plane and one or several Nodes. The control plane maintains the clusters' desired state, such as which applications run on them and which images they use. The nodes are either virtual or physical machines that run the applications and workloads, called Pods. Pods consist of containers that request compute resources such as CPU, Memory, or GPU.

For more information to the different Kubernetes components, refer to our dedicated blog post: An introduction to Kubernetes
Horizontal vs. Vertical Scaling

- Horizontal Scaling means modifying the compute resources of an existing cluster, for example, by adding new nodes to it or by adding new pods by increasing the replica count of pods (Horizontal Pod Autoscaler).
- Vertical Scaling means to modify the attributed resources (like CPU or RAM) of each node in the cluster. In most cases, this means creating an entirely new node pool using machines that have different hardware configurations. Vertical scaling on pods means dynamically adjusting the resource requests and limits based on the current application requirements (Vertical Pod Autoscaler).
Horizontal Pod Autoscaler
The Horizontal Pod Autoscaler (HPA) is able to scale the number of pods available in a cluster to handle the current computational workload requirements of an application. It determines the number of pods needed based on metrics set by you and applies the creation or deletion of pods based on threshold sets. In most cases, these metrics are CPU and RAM usage, but it is also possible to specify your custom metrics. The HPA checks continuously the CPU and memory metrics generated by the metrics-server installed in the Kubernetes cluster.
If one of the specified thresholds is met, it updates the number of pod replicas inside the deployment controller. Following the updated number of pod replicas, the deployment controller will scale up or down the number of pods until the number of replicas matches the desired number. In case you want to use custom metrics to define rules on how the HPA handles scaling your pods, your cluster needs to be linked to a time-series database holding the metrics you want to use. Please note that Horizontal Pod Autoscaling can not be applied to objects that can not be scaled like, for example, DaemonSets.
Vertical Pod Autoscaler
The Vertical Pod Autoscaler (VPA) can allocate more (or less) CPU and memory resources to existing pods to modify the available compute resources for an application. This feature can be useful to monitor and adjust the allocated resources of each pod over its lifetime. The VPA comes with a tool called VPA Recommender, which monitors the current and past resource consumption and use this data to provide recommended CPU and memory resources to be allocated for the containers. The Vertical Pod Autoscaler does not update resource configurations for existing pods. It checks which pods have the correct resource configuration and kills the ones that are not having the recommended configuration so that their controllers can recreate them with the updated configuration.
When you want to use the HPA and VPA both at the same time to manage your container resources, you may put them in a conflict which each other when using the same metrics (CPU and memory). Both of them will try to solve the situation simultaneously, resulting in a wrong allocation of resources. However, it is possible to use them both if they rely on different metrics. The VPA uses CPU and memory consumption as unique sources to gather the perfect resource allocation, but the HPA can be used with custom metrics so both tools can be used in parallel.
Kubernetes Nodes Autoscaler
The Kubernetes Nodes Autoscaler adds or removes nodes in a cluster based on all pods' requested resources. It is possible to define a minimum and a maximum number of nodes available to the cluster from the Scaleway Elements console.
While the Horizontal and Vertical Pod Autoscalers allow you to scale pods, the Kubernetes Node Autoscaler scales your clusters nodes, based on the number of pending pods. The CA checks to see whether there are any pending pods and increases the cluster's size so that these pods can be created. It also deallocates idle nodes to keep the cluster at the optimal size. The Nodes Autoscaler can request to deploy new nodes directly in your pool, within the given resource limits (if any).
Cluster upscaling
If pods are scheduled for execution, the Kubernetes Autoscaler can increase the number of machines in the cluster to avoid resource shortage. The diagram below illustrates how a cluster can be automatically upscaled:
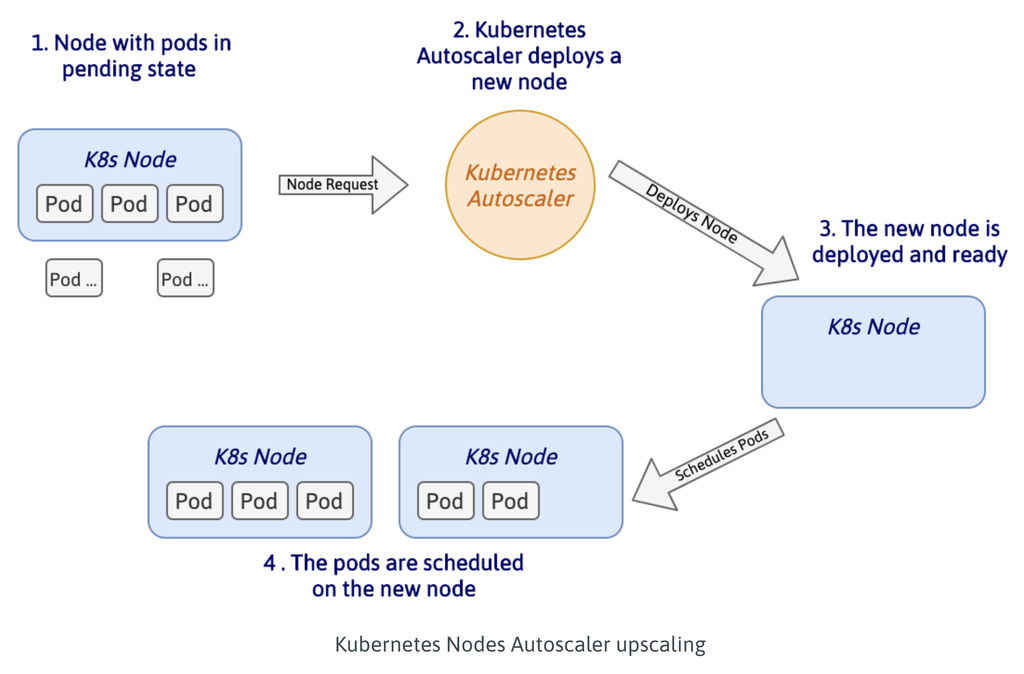
As illustrated, two pods are scheduled for execution but the current node's compute capacity is reached. The cluster autoscaler automatically scans all nodes for scheduled pods. It requests provision of a new node if three conditions are met:
- Some pods failed to schedule on any of the existing nodes due to insufficient available resources.
- Adding a node with the same specifications as the current ones help to redistribute the load.
- The cluster has not reached the user-defined maximum node count.
Once the node is deployed and detected by the Kubernetes Control Plane, the scheduler allocates the pending pods to the cluster's new node. In case there are still some pending pods, the autoscaler repeats these steps as often as required.
Cluster downscaling
The Kubernetes Cluster Autoscaler decreases the number of nodes in a cluster when some are considered not necessary for a pre-defined amount of time. To be considered unnecessary, a node must have low utilization, and all of its important pods can be moved elsewhere without resource shortage. The node scaledown check takes into account the resource requests made by the pods, and if the Kubernetes scheduler decides that the pods can be moved somewhere else, it removes the node from the cluster to optimize resource usage and to reduce costs. If you have defined a minimum number of active nodes in the cluster, the autoscaler will not reduce the number of nodes below this threshold.
Configuring Autoscaling
You can configure Cluster Autoscaling directly from your Scaleway Elements console.
During Cluster creation:
To enable Kubernetes Cluster Autoscaling during the creation of a new cluster, head to step 5 in the cluster creation form, toggle the switch, and set the minimum and maximum resources available for your cluster:

On an existing Cluster:
- From your cluster information page, click on the Pools tab and select the pool to modify. Click Edit in the pools drop-down menu to configure the pool:

2. Toggle on the Autoscale the number of nodes switch and set the desired number of minimum and maximum resources available for the pool:

- Confirm the the modification of the pool by clicking on Update pool.
Conclusion
You now understand the basics of Kubernetes Autoscaling features and how you can use them to configure your cluster for maximum performances.
Deploy your first Kubernetes Kapsule Cluster directly from your Scaleway console and try out the Autoscaling feature.
Article written by
Technical Writer @Scaleway
Get similar stories in your inbox weekly, for free
Share this story:

Scaleway
Scaleway's true mission is to bring you a cloud that makes sense. We offer the right combination of compute power and storage that is flexible, cost effective, reliable, secure and sustainably powered.
Published by
Scaleway's true mission is to bring you a cloud that makes sense. We offer the right combination of compute power and storage that is flexible, cost effective, reliable, secure and sustainably powered.

Latest stories
Best Cloud Hosting in the USA
This article explores five notable cloud hosting offers in the USA in a detailed way.
Best Dedicated Hosting in the USA
In this article, we explore 5 of the best dedicated hosting providers in the USA: …


The best tools for bare metal automation that people actually use
Bare metal automation turns slow, error-prone server installs into repeatable, API-driven workflows by combining provisioning, …
HIPAA and PCI DSS Hosting for SMBs: How to Choose the Right Provider
HIPAA protects patient data; PCI DSS protects payment data. Many small and mid-sized businesses now …

The Rise of GPUOps: Where Infrastructure Meets Thermodynamics
GPUs used to be a line item. Now they're the heartbeat of modern infrastructure.

Top Bare-Metal Hosting Providers in the USA
In a cloud-first world, certain workloads still require full control over hardware. High-performance computing, latency-sensitive …

Top 8 Cloud GPU Providers for AI and Machine Learning
As AI and machine learning workloads grow in complexity and scale, the need for powerful, …
How ManageEngine Applications Manager Can Help Overcome Challenges In Kubernetes Monitoring
We tested ManageEngine Applications Manager to monitor different Kubernetes clusters. This post shares our review …

AIOps with Site24x7: Maximizing Efficiency at an Affordable Cost
In this post we'll dive deep into integrating AIOps in your business suing Site24x7 to …

A Review of Zoho ManageEngine
Zoho Corp., formerly known as AdventNet Inc., has established itself as a major player in …
